Sunday, November 17, 2019

Coffee Time

Aloha,

Well, I've missed the entire coffee challenge again, but I do need coffee cards to tuck into a few gifts. If I had to take a train, I would have to get ready 3 months in advance to try and catch it.


For the little Gorjuss Girl images I colored with Copic markers. Then I used color pencils for the GKD coffee cards. Altogether there are 5 cards for 5 boxes to ship. Now for the test of creating all the address labels! Each step seems like climbing a mountain and it's wonderful to complete the projects!


CARD #1
Stamp Set: Gorjuss Girl "Sweet Tea"
Cardstock: Neenah, SMS
Ink: VersaMark
Coloring with Copic Markers
SU Basket Weave Embossing Folder
White Gel Pen


 Sorry I could not get the tan corrected without ruining the coral red color.


CARD #2
Stamp Set: GKD "Thanks a Latte"
Cardstock: Neenah, SMS
Coloring with Color Pencils
Touch of Wink of Stella Clear


Thank you for stopping by!!!


Monday, November 4, 2019

Kindness Butterfly Shaker Card

Aloha!


This is a card using a beautiful butterfly die and stamp set from Gina K. Designs. The entire set is filled with gorgeous images and sweet sentiments. I put a link to the stamps below.

Shaker cards can be fun because we can gear them up for little children or for adults. It just depends on the images and shaker bits! I didn't use that many bits for this one though. And I will pick out the sentiment after I know who this will go to. But check out the whole stamp set because all of it is incredibly designed, clean, elegant and thoughtful.


Stamp Set: "Love and Kindness" by Gina K. Designs
Cardstock: GKD
VersaFine Onyx Black
Acetate: Grafix
Colored with Sharpies!
Circle and Pierced Circle "Must Have" die sets by Scrapbooking Made Simple (SMS) in Santa Clarita, CA
Shaker bits: Mixture of beads, confetti, stars and sequins (Mostly PPP and Studio Katia)
Adhesive Foam Tape by 3M


Thank you for looking👀


Sunday, November 3, 2019

Foral Heart

Aloha!

This is one of those stamp sets that I fell in love with at first sight. What's more beautiful than a heart filled with flowers, foliage, berries, and fruit? Not much. Click on the stamp set link below to see this mega gorgeous stamp set by Honey Bee! I simply fussy cut and placed on foam. I'll place a greeting once I know who needs this card.

I colored this for The 30 Day Coloring Challenge, November 2019. 


Stamp Set: "Grateful Heart" by Honey Bee Stamps
Cardstock: GKD
Ink: VersaFine Black
Colored with Color Pencils
Foam, double stick tape, white gel pen
A tiny bit of sparkle - Nuvo Aqua Shimmer Glitter Gloss


Mahalo for stopping by!


Wednesday, October 30, 2019

Sparkly Anniversary and an adventure with the Gemini Jr.


Aloha!!!

You know how you really want something to work?

Recently, I gave in and bought the Gemini Jr. My wrists are pretty bad. The first machine tore up the die and plates when I tried to use it. The instructions are very simple but yikes. Exchanged it. The second one cut really well so I kept the pieces and made an anniversary card (below). But when I tried to emboss, the machine sucked in the sandwich, the lights flickered on and off, there was a loud clunk and it turned off. I couldn't get it turned back on for a while. When it did come on, it shot the whole sandwich out through the other end like a shotgun. Good thing no one was standing over there. I held my breath to try it again but while it seemed a very tight squeeze, it wasn't terrifying like the previous attempt.  👀

Trying to problem-solve the super tight squeeze of this machine, I saw a YouTube video using a glass mat someone cut into 6"X9" pieces to substitute for using the plates. Bruce cut the mat up and I will try that next time. Maybe the sandwich won't be so tight when cutting and embossing. I've been holding my hands over both openings when sending a sandwich through because I am fearful this machine is going to hurt something.

Here is the card I made from the trial pieces of the second machine. The sentiment is black on the bottom, then three layers of white on top of that. I love using a white gel pen to write on black cardstock.

No Stamp Set :D   I can seldom say that!
Couture Creations "Opulent Swirls" Dies
Hammerhill White, SMS Black
Tonic Dies "Happy Anniversary"
SU gems
Connect Glue


“The love we give away is the only love we keep.”
 Elbert Hubbard

Thanks so much for stopping by!

Friday, October 25, 2019

Flotnar! Seafaring Viking!

Aloha! or God tag!

Thar be vikings, argh! Let the voyage begin!

We have a good friend and each time I see him, I see a viking! I've always told him this and he laughs! So yesterday he stopped by for a short visit with Bruce and me and I knew it's time to get that card made for him. And here it is!

Years ago I even bought this little stamp set just to make our friend a viking card. While he does not have any facial hair, he is very muscular, fair and has light reddish hair - viking to me! He has muscles on his muscles. After a few minutes, I had to go rest and Bruce spent the rest of an hour or so with him. They had a great time talking about building things.

I looked online for old viking ships and sketched this one out with the mountains, rocks and the hill he is standing on. It's supposed to be a full, moonlit night reflecting on the water. The oars are pulled into the ship (use your imagination). And there is nothing sparkly or shiny on this whole card (yup, haven't done that in a long time).


Stamp Set: "Viking" by Avery Elle
Ink: Soft Glow by GKD
Copic Markers, color pencils, black Copic multiliner
Hammerhill Color Card 110#, GKD Black


Thank you for stopping by!


Thursday, October 17, 2019

Busy City Kitty Cats

Aloha!

I love animals! Look at all these little kitty cats! This stamp set stole my heart when I first saw it. Most of the little sweet images are used on these four cards. You can't really see but there's Wink of Stella and Glossy Accents all over the place. One of these is going to Japan, all the way to my older sister's house by Mt. Fuji 🗻 !!

These are colored strictly for the fun of it, no challenges, just to smile while scribbling away with color pencils!


Stamp Set:  "Little Cat Agenda" by Mama Elephant
Cardstock: GKD, SMS and Hammerhill Color Card White
Pattern Paper: Lawn Fawn
Inks: VersaFine Onyx Black
Prismacolor Pencils w/touch of Gamsol
SSS Clear Embossing Powder
Wink of Stella
Glossy Accents
Circle and Scallop Circle Paper Punches


Mahalo for stopping by!
I hope you have a lovely rest of your week ♥


Saturday, October 5, 2019

Antarctic Anniversary

Aloha!

It's nearly a miracle - I was able to finish a card for World Cardmaking Day! Yay!! I usually miss this. How about 2 sweet penguins on a heart-shaped ice sheet, floating at night in the Antarctic?

Did you know penguins live in the southern hemisphere, mostly in the Antarctic? They are not up in Alaska or other northern areas. And they only eat meat. Because of their shape, they can swim up to 15 mph!!!

Your Next Stamp is having a challenge to create an extra long card. I love making Anniversary cards for friends and for us. I also love starry night skies and penguins, so this brought me a lot of happiness to make! This is also going to be uploaded to the Simon Says Stamp Worldcardmaking Day Challenge!


Stamp Set: Penguin in Love by Your Next Stamp
Cardstock: Hammerhill Color Card 110#
Color Pencils
Distress Inks
Adhesive foam
Masking
Crystal gems from Honey Bee
White Gel Pen
Wink of Stella Clear Sparkles


/


Mahalo for stopping by!
Happy World Cardmaking Day!


Sunday, September 22, 2019

Puppy Love

Aloha dear ones,

Have you heard of the My Favorite Things Super Star Challenges going on? I thought we had more time, but I will try to enter a CAS style. They also have a Coloring as well as Innovation Challenges. Alas, 3 hours more left. You know how hard a time I have to keep something CAS. My brain and hands start itching if I stop too soon lol! Did you get to play along this year?

Here is the link: My Favorite Things Annual Super Star Challenges!


Stamp Set: My Favorite Things "You Have My Heart"
Color Pencils (Prismacolor this time)
Clear and Bronze Embossing Powders; Kraft Cardstock.


Keeping it CAS -- that, in itself, is a challenge.
Mahalo for taking a peek at it!


Tuesday, September 17, 2019

Autumn in Montana

Aloha!

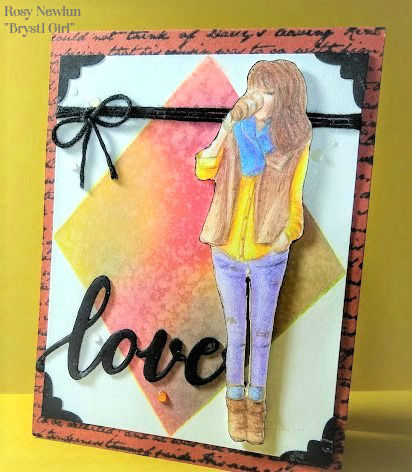
Not us -- one of our daughters. She moved to Montana, loves the country life and is looking for a house. I've been thinking of what kind of card to send her when I saw this design by Angie Blom at Unity Stamps. Our daughter loves coffee and we'll tuck a gift card to Starbucks in here.


This is a photo of our daughter, Amy. It's about 5 years old or so but I can't find a more recent one. They're likely in my phone. She's our youngest and is 36. Wipe the tears from my eyes - how did all the time fly so fast?

Amy has a new beau after her husband died a few years ago. It was so unexpected during heart surgery. We are still and will always miss such a generous, kind and intelligent man.  But after several years, we are so happy she has a new love in her life and wish them the very, very best. 

I couldn't get the hair color right with the color pencils but right now her hair is a little shorter - I think she might like this! I layered three of the sentiments together. 


Stamp Set: "Brystl Girl" by Unity Stamps; MFT "Romantic Script" (background)
Cardstock: GKD Faded Brick, Black Onyx; Hammerhill Color Card white
Ink: GKD Warm Glow, Black Onyx
Color Pencils
Distress Oxide Inks and Diamond Stencil
Photo Corner Punch
"Love" die from Poppy
Black Twine, Crystalline Drops (don't you love this product?), Adhesive Foam
Perfect Pearl mixed in water in sprayer


Thank you for taking the time
to stop by and say "hello!"


Wednesday, September 11, 2019

There's No Place Like Gnome

Aloha,

We found a super lawn care person! Living in a tropical jungle, good, dependable lawn care people are appreciated like gold - especially if they don't gouge you with charges! I just had to make a thank you card for our new guy!!!

I enjoyed making a very simple Lawn Fawn scene for our "lawn" guy. And what a surprise for me? I made it in time to give it to him as well as enter it into the September Lawn Fawnatics Challenge !!! Whootie whoooot! I usually miss a challenge deadline by a month or more. How I thought about making it into an interactive card, but I've been too tuckered out lately.


Stamp Set: Lawn Fawn "Gnome Sweet Gnome; sentiment from "Jump for Joy" Lawn Fawn
Cardstock: Lawn Fawn, Hammerhill Color Card
Dies: Lawn Fawn "Sitcthed Hillside Border"
Inks: Memento Sahara Sand (image outlines) and Blue Sky (sky)
Lawn Fawn Trimmings in "Peppermint"
SSS Cloud Stencil
Copic Markers; Color pencils in brown and dark gray
Ranger "Liquid Platinum" Embossing Powder
Crystalline Drops (over the bee's wings, mushroom windows and the little gnomey's belt buckle)
Corner Rounder; foam adhesive by Scotch


Thank you so much for stopping by!
May your week be filled with sunshine ♥


Monday, September 2, 2019

Living Hen and Chicks

Aloha!

It's a new month, a new week, a new day! Welcome!

Don't you love the sweet little succulent Hen and Chicks? I do! But here is a confession: I have killed every single one I've ever purchased. Why, oh, why? I love them.

I've tried leaving them alone, in indirect sunlight, in bright sunlight, in shade, with light water, no water, in nature, in the house, in the kitchen, ignoring, talking to, and begging it not to die. It's one plant I feel a total failure in trying to grow. Any hints?

I had a friend in central Oregon and she had one she completely ignored, rain, sun, snow. That thing was living in a dead oak barrel with millions (okay, hundreds) of little chick babies sprouting all over the thing. She even gave me some and I killed it right off. UGH.

This is the next best thing for me - color it. Marcella Hawley has this in her online, digital collection located here: Hen and Chicks in case you would like this one to print off and color!


Digital Stamp: Power Poppy, "Hen and Chicks"
Copic Markers (mostly G's, BG's, YG's and R's, and mostly lightest to mid colors)
Prismacolor White and Dark Brown Pencils
Cardstock: Hammerhill Color Copy 110 lb (white), GKD (color)
Crystalline Drops (GKD) for the water droplets on some of the little petals or leaves or whatever those are called on succulents :D
Corner Rounder


I cannot think of a sentiment to put on here yet.


Mahalo for stopping by ♥

Monday, August 19, 2019

Blossoming Trees

Aloha dear ones,

This is a simple card but took me a long time to make. It's a die cut of a cherry tree on a foam layer, the petals filled in with color pencils and Wink of Stella on top.

It's going to the owners of Scrapbooking Made Simple. Stacey's hubby is facing a very challenging health issue. Most of the products used for this card are made by them.


SMS, Stamps & Die Sets: "Beauty, Cherry Blossom Orchard" die frame (front); "Spring Fling, Good Times Ahead" stamps (interior sentiment); "Must Have" Oval dies set and "Must Have" Rectangle dies set (interior); Vintage Garden Floral Flourish stamps (envelope)
Cardstock: SMS white and pink
Inks: Memento Angel Pink; Rosebud; Desert Sand
Prismacolor Color Pencils
Wink of Stella
Perfect Pearls in Buttercup (the centers of the flowers)
Crystalline Drops GKD
Corner Rounder Cropadile
Stick It double sided adhesive
Foam sheets
Stays Put glue


Wishing each of you and yours
the best of health.


Daydreaming, Doodling, Zentangle

Aloha dear friends,

Sometimes it clears the brain to just sit and doodle. Listen to some gentle music, see how puffy the clouds are, feel the wind (or in my case, the fan) in your hair. It's that time of the year when the summer sun gets less strong and the evenings get that familiar crispness in the air.

I am in an online mini class called Whimsical Patterns taught by Sandy Allnock. You can watch the free introductory video to the class HERE.

The first lesson is just to get your brain and hand loosened up, less rusty, and remember to let the ink flow. Notice how the lines are not straight, not much is even, and the solid leaves are not so solid. Just have fun 🖍 Then you can turn it into a card!


Cardstock: GKD White, SMS Black
Pilot Gold and Silver markers with extra fine points
Gold cord, sequins, double stick tape


"Seeing Leaves"


See you again soon 💕


Tuesday, July 30, 2019

Honey Bears

Aloha again!

Remember Winnie the Pooh? I love that story! In the 80s (I think) one of our daughters fell in love with the classic "Pooh" style of coloring. It was very soft and pastel. That's a little bit of what I tried to do here using color pencils. I miss when our kids were very little, loved and hugged us all the time, and thought we could fix everything :D  Here's to YOU, Winnie the Pooh!


Stamp Set: "Curious Forest Friends" by W Plus 9
Color Pencils "Crayola) no kidding, just the 16 pack I think
Stamped with Memento Sand Ink
Crystalline drops by GKD
Larger opaque drops by SU
Oval dies by Hero Arts and Gina Marie
Bee from Jolee's Boutique


Thank you for visiting!!!


Monday, July 29, 2019

The Fetching Hibiscus

Aloha friends,

If you are fortunate enough to have a hibiscus or the Rose of Sharon or any of the "mallow" family of plant, then you have some real beauty treats to see. We have only one hibiscus bush in our backyard. But boy, is it a GIANT. The stems can grow up to 10 feet high or more and we have to keep these trimmed back. It is covered in yellow/red big, dinner plate size flowers. It's such a treat to see them. And thank you for stopping in and not forgetting about us. PS Bruce broke his arm :/  I am seriously thinking he doesn't want to go back to work LOL!


Stamp Set: "Hibiscus Bouquet" by W Plus 9
Watercolors: Daniel Smith
Arches Cold Pressed 140# Paper
Stamped with Stazon black ink
Spellbinder Square and Scallop Square dies
Corner Rounder


Mahalo for stopping in 


Friday, July 26, 2019

Done Adulting

Aloha, friends,

I'm back. It's been rough for several months with Bruce's health. But he's better and back to work  🎉 !   And I'm here ♫ !!

Needless to say, there were plenty of days I felt done with adulting. Here is a little penguin just playing in sand, building igloos. May each of us have days when we don't have to adult.


Stamp Set: "Waddles Beach Fun," by Your Next Stamp
Cardstock: GKD (my favorite of all)
SSS Curved Border Die
MFT Diagonal Background Stamp (turquoise layer)
Stamped with Memento Desert Sand & Summer Sky (perfect for a beachy scene!)
Colored with Copic Markers
Foam Strips (to pop the umbrella and star fish)
Spectrum Noir Glitter Pen (water and shiny things)
Pretty Pink Posh sequins; sparkly mini stars; cut a curvy paper to sponge the clouds


I've sure missed playing.
Thank you for stopping in 😊


Sunday, March 31, 2019

Eggplant Waterfall

Aloha!

Sounds like Alice in Wonderland: Eggplants flowing over a cliff into a pond full of the purple critters floating all over...

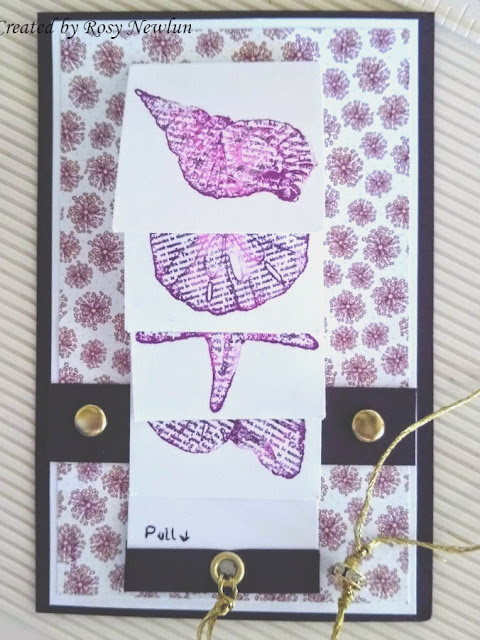
It's a waterfall card, made with eggplant purple card. I didn't know what else to call this. Pull that gold cord and each of the four eggplant purple sea shells slip up and behind each other revealing the secret message. After all pieces disappear behind the strip, you can gently slide the whole strip upwards and the pieces will easily fall right back into place. I used sturdy paper for everything here. It should take quite a beating and still be ok!

Below is link to a YouTube video showing the steps to make a simple one. Of course, my cards are seldom simple. They must be harder than imaginable and needed asap. And the harder, the better. I wish there was more time so that I could have added bling and 2 layers to each square piece, to make it more special. And I don't have a stamp that says "Pull Here." Homemade is good enough.

Waterfall card simple video tutorial

-----------------------------------------------------------------------

Stamp Set: By the Seashore, Stampin' Up
Cardstock: SMS White 110#, Stampin' Up Eggplant Purple & DP (thus, the eggplant waterfall)
Inks: Hero Arts & Memento (if it matches, I'm-a using them. Takes me forever to find all my ink pads ♥ )
Square Hand Punches & a Score Board w/tool
Soft gold brads and eyelet w/Cropadile punch
Gold cording and a gorgeous rounded silvery wheel shape covered in crystals.

-----------------------------------------------------------------------

I wrote some sweet little words on the backs of each square piece that flips backwards. As you pull the strip down, a final hidden message is shown :D Squeee - funnnn!  The strip in original place creates a secure place to stash some cash or gift card right behind it. Folded bills show up on each side of the main strip. Great gift card with an action piece!

***SPECIAL HELPFUL HINTS: Use really stiff cardstock for the base as well as the strip you use for pulling. They will take a beating. Use Scor Tape or similar double stick tape for adhering the pieces together. Make sure you add each square piece of the waterfall so that the top edge of each square lines up "just under" the score line. That helps the pieces flip up and over easier.The brads and eyelet are nice touches. 


Hope you enjoyed the idea of a waterfall card!
Mahalo for coming by ♥


Monday, March 4, 2019

The Offset Top

Aloha, friends!

Is it spring yet? (Don't throw anything at me.)

Do you remember what this type of card design this is called? Is it Offset Top? I remember Gina making a similar style years ago, but I don't even know where to begin looking to find the name of this.

When I made the "open heart" bear card, I stamped this one, too. I really enjoyed Gina's design of setting the focal image on top of her card and that is who I CASEd. My brain is stuck when it comes to the design name.


Stamp Set: "Baby Bear" by Stampin' Up
Cardstock, inks, ribbon: GKD
Inks: GKD, Distress; and Tombow markers
Embossing folder: Swiss Dots by Cuddlebug
Dies: MFT (stitched circle and scallops); SB (sentiment, cut in 1/3)
Sequins: Pretty Pink Posh
Craft foam, Scor Tape, micro glue dots
The Bow Easy :D


Mahalo for stopping by to visit!!!
And for helping me out with what this is called :)


A Waddle of Penguins

Aloha!

I was late finishing a group of penguin cards, but loving each one. Aren't penguins just precious to look at? Even the way they walk makes me SMILE! This one is holding hot cocoa with five marshmallows floating on top. And he's wearing a dottie sweater.

The penguin and scene is a digi image designed by Crissy Armstrong for Whimsy Stamps. She has a large collection of penguins and many other cute critters.

The card bases are stamped with VersaMark then heat embossed with a sparkly embossing powder. I colored the scenes with Copic markers and color pencils. I also stamped and colored the envelopes with a little girl in a parka and narwhal. It was very pleasurable to color these while watching old movies or listening to books. Let's see if I can be on time with summer cards :P


Image: "Penguin Coffee Break" digi by Crissy Armstrong at Whimsy Stamps; Avery Elle "Polar Pals" (little girl and narwhal); Polka Dot background stamp by MFT
Cardstock: GKD White 120#, Neenah white 80#, Black
Inks: Gina K. Designs, Hero Arts, Memento (metallic inks) VersaMark
Dies: Gina Marie
Copic markers, color pencils
WOW "Clear Sparkle" embossing powder
Glossy Accents
Snowflakes Toner Sheets by GKD
Irridescent foil by GKD & Minc machine; Nuvo Sparkle Pens; clear gems and sequins
Envelopes (very smooth) Stampin' Up


If I could send a handmade card to every 
person I know, my heart would sing long passed when
 the cows come home, or longer.


Mahalo for stopping by :*


Triple Stamping Teddy Bears

Aloha, friends!

A dear friend of ours went through a second open heart surgery recently. Talk about worry. I will never forget the first time I worked in an ICU and we received an open heart surgery from the O.R.

When I saw this teddy bear stamp, all I could think of was putting a sweet little red heart on it in case I needed an open heart surgery or other surgery card. If you lift up the top flap of the heart, it has a special, mini sentiment in there. Then you can lower the front of the heart back down. All I needed was a mini bandaid to stick on the heart, but we don't have one. Instead of triple stamping this, perhaps I dozen-stamped this bear in order to get the 3 colors and depth to the fur. I also used some markers and pointalism to get the shading. But he has the right amount of fluff now!

Our friend has arrived back from the east coast yesterday :D I think he's going to be fine. I hope he likes his teddy bear card because after all, he is a big teddy bear himself.


Stamp Set: "Baby Bear" (for adults, too, ☺) by Stampin' Up
Inks: Gina K. Designs; Tombow Markers
Card: Gina K. Designs 120# Ivory and Red
Stitched and Rectangle dies by MFT
Mini Heart paper punch, Glossy Accents, Scor Tape, Soft gold round metal gems, ribbon by GKD


Mahalo for coming by!!!


"Black Parrot" and "Green Wave" Tulips (Ugly version vs pretty version)

Aloha, all,

Part 1 of 2: The "Black Parrot" Tulips (or
as I view these: Ugly & Pretty)


Did you know there are tulips that are almost all black or deep, deep bluish purple? I've seen pictures but I don't recall seeing them growing. North of Seattle, Washington are tulip farms! Each spring, as far as your eyes can see, are rows and rows of solid colors - one row red, another yellow, another white. You can turn around in a circle and see colors, in perfect rows from anywhere you look. It is breathtaking!

I didn't want to just use blacks and navy to color flowers, so I added pinks and lavenders, too. First I Masked the bottom or first layer of flowers and using the new-to-me "Life Changing Blender Brushes" from Picket Fence Stamps. Yup, they are even easier to use than Clarity brushes or sponging tools. I sponged pink and blue distress inks into a rectangle, ever so slightly. Then I colored the flowers on the card base.

After printing another digi of the tulips onto cardstock, I colored and fussy cut the flowers and leaves. Finally, I popped them on fussy cut pieces of foam. It's sort of like the old decoupage 3D look. I regret adding the Spectrum Noir sparkle marker over the flowers but I'll just tuck that bit of experience into the deep cobwebs in my mind. I'll also add the "don't use super dark blues on flower edges even if they look black in real life" because they just take too much attention from the rest of the flower and scene.


Stamps: "Tulips" digital from Power Poppy (Tulips (and Peonies) are each on sale now for $2.49)
Cardstock: Neenah Solar White 110#
Copic Markers, Color Pencils, distress inks
Adhesive Foam, Scor Tape, Spectrum Noir Sparkle Marker, Sequins from Pretty Pink Posh


I'm sorry, these are ugly to me. But I'm posting them
just to show what not to do. Blech.
A ton of work ends up yucky.


Part 2 of 2: The "Green Wave" Tulips

So these turned out more eye pleasing. Seriously, what a long weekend of trying to capture realistic colors in a tulip LOLOLOL!

Same digi, different colors, Copic markers, no pencils, no sparkly marker. 


Don't say I'm not brave LOL. I'm even
posting ugly up there.

Mahalo for stopping by ♥


Wednesday, February 27, 2019

Rocking Horse

Giddy up, partners!!!

Yay, I finally need a Welcome Baby card! Don't wooden rocking horses bring back nostalgic memories? Handmade wooden rocking horses are a true work of love and heart!

The rocking horse image below warmed my heart and made me smile. I hope you like it, too. It's in a stamp set that is on super sale right now at Paper Smooches for just (ready?) $6.50!!! They have quite a bit on sale right now. Just click on the "sale" link -- dies start at $2.15! Lots of stamp sets are under $8.00. I just missed the February card challenge but enjoyed coloring this cutie in neutrals and as CAS as possible (for me).


Stamp Set: Knick Knacks by Paper Smooches
Cardstock: GKD 120# white and Neenah Desert Sand
Ink: Memento Tan
Wonky and Stitched Dies by Gina Marie; Heart die by Paper Smooches
Prismacolor and Crayola Color Pencils
Sakura Clear Sparkle Gel Pen, Glossy Accents, Score Tool (for the wood floor) Gold Mirror card, plain twine, craft foam & Scor Tape


Mahalo for coming by the blog!ra


Tuesday, February 26, 2019

The Calla or Peace Lily

Aloha!

The Calla Lily. It is not a lily at all. The botanist made a boo boo and it just stuck being called a lily. However, it is a cousin to the Anthurium - a red, heart shaped flower with yellow spike in the center. And what do Calla Lilies and the box jellyfish have in common? Neither need a mate to reproduce! ;)

Here is a lovely painting by Henri Matisse depicting his interpretation of these gorgeous flowers:


by Henri Matisse


The Calla Lily comes in a rainbow of colors. This one started out as a white one, but evolved into lime yellow. It's colored with a strange combination of color pencils, Copic markers and Memento markers. Then I covered it with clear sparkly marker - it glows.


Stamp Set: Elegant Florals by Theresa Momber for GKD, as well as the sentiment in Gina's Stippled Flowers set; Background is MFT Bundles of Flowers
Cardstock: Neenah 110# white and Bazzill lime color
Inks: Gina K. Designs
Crayola and Prismacolor Pencils, Copic and Memento markers
Nuvo Clear Sparkle Marker
Yellow dots by W+9; Oval & scallop dies by Spellbinders; Corner Rounder; ribbon, craft foam layer & glue dots


Thank you for coming by!!!


Saturday, February 16, 2019

You Light Me Up

Aloha!

It's a sunny and warm day here, very warm after the cold snap (cold for us). It was 19 degrees above us on the mountains and it was brutal for a few days. Felt like central Oregon, the high desert, during the winter cold. I won't try to convince you lololol!

Here is a Lawn Fawnatics Color Challenge I would like to try and play along with:


When I was a little girl of about 4-7 we lived in Tennessee, way out in the country. I remember riding a bike down empty back roads through green, rolling hills to go visit a super sweet teenage girl who used to let me ride her big horse. She would walk ahead of the horse while holding the reins, letting me ride slowly through a meadow filled with tall grasses and flowers. Some early evenings my brothers and I used to run around to catch fireflies in an old jar. They used to have a little stanky metallic smell. They were beautiful to me and we let them go after an hour or so. Now for this card :) 

Aiming for a nighttime sky, I used watercolor paper and the ink smoosh technique. I was inspired by Kristina Werner who was inspired by Laura Bassen. It is a popular, easier technique but it took me about 10 tries to get an acceptable color. I have no idea what I did with my watercolors, so I used markers instead.

After coloring and die cutting the fireflies, I adhered them to circle punched vellum pieces. I covered the background layer with copious Wink of Stella clear to give it some major sparkle, as well as covering the fireflies. Then I heat embossed the sentiment with a silvery gold embossing powder on vellum and that's about it. Took me a couple of days because of how slow I'm getting :D


Stamp Set: "Summer Charm" by Lawn Fawn
Watercolor paper by Strathmore
Background: Tombow Markers, water and Wink of Stella
Fireflies: Copic Markers, Wink of Stella
VersaMark and Platinum embossing powder by Simon Says Stamp
Vellum Glue Dots & Scortape; Round paper punch; craft foam
Sequins by Pretty Pink Posh


Mahalo so much for stopping by!


Wednesday, February 13, 2019

Panda Mail

Aloha!

Here is a card for our sweet, hardworking, never-complain mail lady ♥  I've been thinking about how long it's been since giving her any kind of recognition so today is the day.

Today is the first day I haven't needed to wear enough clothes to look like someone from the Yukon since last Friday. Low 70s is more like it for this time of year and that's what the scene is about. No brutal winds or downed trees, calm ocean with no white caps :)  Boy, do I feel for everyone who is covered over in snow, ice and darkness right now. Big hugs!!!


Stamp Set: "Incoming Mail" and the palm tree from "Summer Days," both by Mama Elephant: Starry Sky background by Hero Arts (embossed on the white layer)
Inks: Memento (sponging) and Copic markers; VersaMark
Cardstock by GKD
Spectrum Noir clear sparkle pen and Sharpie White paint marker
Hero Arts Clear embossing powder


Mahalo for coming by!!! ♥


Sunday, February 3, 2019

Lots of Lavender

Aloha!

Here is another CAS card using an easy technique to get a bit of stained-glass look to any lined image. Just heat emboss it, preferably with a metal finish powder. Take any markers, (water or alcohol) and tap different colors inside each small area, just like a stained glass piece might have. You can create this on cardstock, acetate or vellum. If you use vellum, the colors will look best if you add them to the back side of the embossed layer. I used a scoring tool to create a border as well as a die to cut a zigzag finish.

I made several of this design, then embossed different sentiments to adhere when it's time.


Stamp Set: "Lots of Lavender" by Stampin' Up
Inks: Coloring with Copic Markers
Cardstock: GKD 120#
MFT zigzag die
Silver Embossing Powder; VersaMark; Corner Rounder Punch


Thank you for stopping by! Here's to an early spring for those
of you living in the bitter cold areas!


Friday, February 1, 2019

Layered Flower Hello

Aloha friends!

This is a simple, quick card. I sent it to a lady who works at our health insurance company because she helps us to qualify for lower costs, reviewing and renewing our application every six months. This went with our latest renewal paperwork. Without that help, we could not afford 90% of the care and medications we receive! Here's to people who really help the community :D !!!

You can see I tried to poke a few holes by using the piercing tool, but it ended up getting cut off during the final process. There are few left on there. I love when the sentiments can be curved into different shapes! Thank you for stopping by, and here's to an end to the brutal cold in the midwest & east of the US and Canada!


Stamp Set: Altenew Majestic Bloom; Hello by Hero Arts
Inks: Simon Says Stamp
Cardstock: Gina K. Designs
Corner Rounder; Red gems; piercing tool; Wink of Stella (all over the flower)


Mahalo for stopping by!
And here is a warm hug filled with aloha for you ♥


Friday, January 18, 2019

Pink & Coral Healing Thoughts

Aloha,

I'm still here!

I stamped a background stamp and heat embossed it in Silver Pearl. The frosted vellum circle on top is stamped with a flower bouquet,. LOL I thought these were dahlias until OOPS I looked again and saw daffodils! So just think of this as creative license and I made up some coral pink flowers of an unknown variety. I then colored the image on the backside of the vellum. Taking a rounded stylus, I gently pushed the flowers and leaves forward for some dimension. I used some white drops, some crystal glitter drops discreetly and then added the twine bow. The colors are corals and pinks with white.

PS I highly recommend taking the Color Pencil online class that Sandy Allnock teaches. You will go from beginning to moderate-moderate/advanced in her class (your level will depend on the hours, practice, homework and continued practice you put into her classes). There are hours of videos, samples, downloads, color charts (including her color pencil hex chart based on the Copic marker hex chart she developed). You will be amazed at all the techniques she will show you and the different materials you can color on. Here is the link to her class (I don't get anything for recommending her to you, but I am one of the moderators in her Facebook students group page). You can always join her FB group if you take one of her classes. Here you go: Color Pencil Jump Start online class


Stamps: Power Poppy "Daffodil Bouquet;" the sentiment is from GKD Stipple Flowers and the lace border inside and out is from GKD Petite Borders. On the inside are roses from Scrapbooking Made Simple; I'm not sure who made the background with the diamond dots.
Cardstock: Neenah White 110#, SU Pink Pirouette; Graffix Vellum
Inks: VersaMark, Memento
Embossing Powders: GKD Fine White; Silver Pearl by WOW
Die Cuts: Scrapbooking Made Simple Circles
Prismacolor Pencils
Ranger White Enamel Accents; Ice Stickles Diamond
Adhesive Foam; glue dots


It took a bunch of tries to get a photo. I couldn't get the lighting, colors or hues correct. I'm sorry I let the twine cover up the sentiment, grrrr. It says "Sending healing thoughts."


Thank you so much for visiting ♥