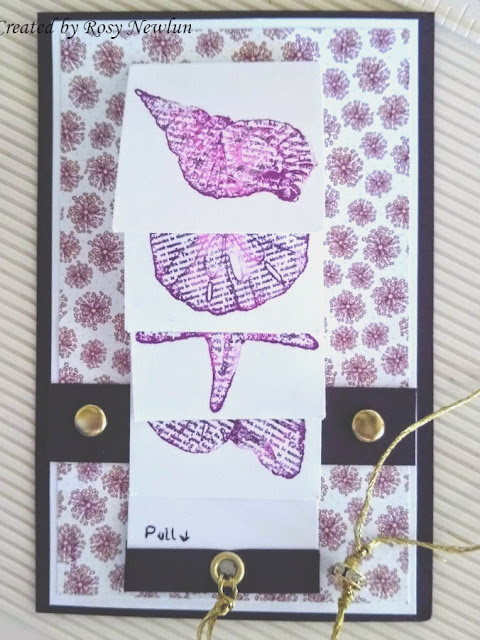
Sounds like Alice in Wonderland: Eggplants flowing over a cliff into a pond full of the purple critters floating all over...
It's a waterfall card, made with eggplant purple card. I didn't know what else to call this. Pull that gold cord and each of the four eggplant purple sea shells slip up and behind each other revealing the secret message. After all pieces disappear behind the strip, you can gently slide the whole strip upwards and the pieces will easily fall right back into place. I used sturdy paper for everything here. It should take quite a beating and still be ok!
Below is link to a YouTube video showing the steps to make a simple one. Of course, my cards are seldom simple. They must be harder than imaginable and needed asap. And the harder, the better. I wish there was more time so that I could have added bling and 2 layers to each square piece, to make it more special. And I don't have a stamp that says "Pull Here." Homemade is good enough.
Waterfall card simple video tutorial
-----------------------------------------------------------------------
Stamp Set: By the Seashore, Stampin' Up
Cardstock: SMS White 110#, Stampin' Up Eggplant Purple & DP (thus, the eggplant waterfall)
Inks: Hero Arts & Memento (if it matches, I'm-a using them. Takes me forever to find all my ink pads ♥ )
Square Hand Punches & a Score Board w/tool
Soft gold brads and eyelet w/Cropadile punch
Gold cording and a gorgeous rounded silvery wheel shape covered in crystals.
-----------------------------------------------------------------------
I wrote some sweet little words on the backs of each square piece that flips backwards. As you pull the strip down, a final hidden message is shown :D Squeee - funnnn! The strip in original place creates a secure place to stash some cash or gift card right behind it. Folded bills show up on each side of the main strip. Great gift card with an action piece!
***SPECIAL HELPFUL HINTS: Use really stiff cardstock for the base as well as the strip you use for pulling. They will take a beating. Use Scor Tape or similar double stick tape for adhering the pieces together. Make sure you add each square piece of the waterfall so that the top edge of each square lines up "just under" the score line. That helps the pieces flip up and over easier.The brads and eyelet are nice touches.
Hope you enjoyed the idea of a waterfall card!
Mahalo for coming by ♥

This is great! I’ve never tackled a challenging card like this one—so I applaud your skill and admire your results!
ReplyDeleteVery nice! I have made a waterfall card one time. It took so much work, it has not been sent. They are fun, though.
ReplyDeleteYou had me imagining something quite different when I read the first few lines. I pictured pretty egg plants being used somehow in a waterfall situation. But after reading further I realized what you meant. And, I must say that is a wonderful waterfall card. I only made one of these kind of cards and I found it so difficult that I never even thought of trying it again. I guess I am basically the CAS type of card maker and I won't veer away from that path very often. But I did enjoy yours very much. I hope you are doing well this Spring too. Thanks so much for sharing.
ReplyDeleteWell I'm impressed! Don't think I have ever seen one let alone trying to tackle. Great job Rosy & thanks for the inspiration!
ReplyDeleteOh I just love this! I love making waterfall cards, especially for kids. They seem to really like them. Yours is just wonderful. I really like the colors you chose, and the gold accents are perfect. I am smiling, this is simply fabulous!
ReplyDeleteWow! I have never created a waterfall card. I love your pretty shells. Thanks for the great tips!
ReplyDelete