Sunday, March 31, 2019

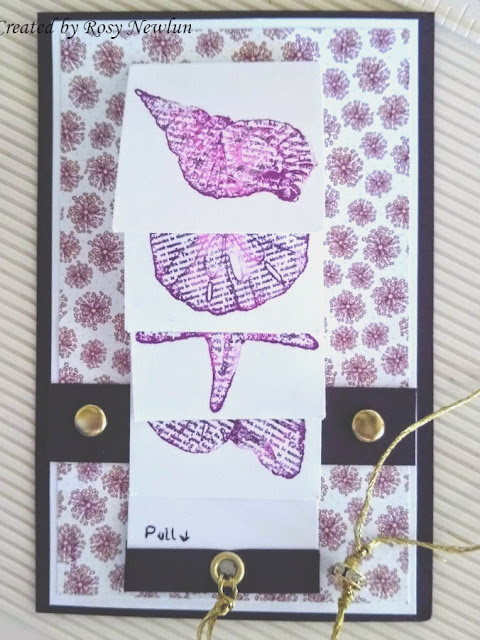
Eggplant Waterfall

Aloha!

Sounds like Alice in Wonderland: Eggplants flowing over a cliff into a pond full of the purple critters floating all over...

It's a waterfall card, made with eggplant purple card. I didn't know what else to call this. Pull that gold cord and each of the four eggplant purple sea shells slip up and behind each other revealing the secret message. After all pieces disappear behind the strip, you can gently slide the whole strip upwards and the pieces will easily fall right back into place. I used sturdy paper for everything here. It should take quite a beating and still be ok!

Below is link to a YouTube video showing the steps to make a simple one. Of course, my cards are seldom simple. They must be harder than imaginable and needed asap. And the harder, the better. I wish there was more time so that I could have added bling and 2 layers to each square piece, to make it more special. And I don't have a stamp that says "Pull Here." Homemade is good enough.

Waterfall card simple video tutorial

-----------------------------------------------------------------------

Stamp Set: By the Seashore, Stampin' Up
Cardstock: SMS White 110#, Stampin' Up Eggplant Purple & DP (thus, the eggplant waterfall)
Inks: Hero Arts & Memento (if it matches, I'm-a using them. Takes me forever to find all my ink pads ♥ )
Square Hand Punches & a Score Board w/tool
Soft gold brads and eyelet w/Cropadile punch
Gold cording and a gorgeous rounded silvery wheel shape covered in crystals.

-----------------------------------------------------------------------

I wrote some sweet little words on the backs of each square piece that flips backwards. As you pull the strip down, a final hidden message is shown :D Squeee - funnnn!  The strip in original place creates a secure place to stash some cash or gift card right behind it. Folded bills show up on each side of the main strip. Great gift card with an action piece!

***SPECIAL HELPFUL HINTS: Use really stiff cardstock for the base as well as the strip you use for pulling. They will take a beating. Use Scor Tape or similar double stick tape for adhering the pieces together. Make sure you add each square piece of the waterfall so that the top edge of each square lines up "just under" the score line. That helps the pieces flip up and over easier.The brads and eyelet are nice touches. 


Hope you enjoyed the idea of a waterfall card!
Mahalo for coming by ♥


Monday, March 4, 2019

The Offset Top

Aloha, friends!

Is it spring yet? (Don't throw anything at me.)

Do you remember what this type of card design this is called? Is it Offset Top? I remember Gina making a similar style years ago, but I don't even know where to begin looking to find the name of this.

When I made the "open heart" bear card, I stamped this one, too. I really enjoyed Gina's design of setting the focal image on top of her card and that is who I CASEd. My brain is stuck when it comes to the design name.


Stamp Set: "Baby Bear" by Stampin' Up
Cardstock, inks, ribbon: GKD
Inks: GKD, Distress; and Tombow markers
Embossing folder: Swiss Dots by Cuddlebug
Dies: MFT (stitched circle and scallops); SB (sentiment, cut in 1/3)
Sequins: Pretty Pink Posh
Craft foam, Scor Tape, micro glue dots
The Bow Easy :D


Mahalo for stopping by to visit!!!
And for helping me out with what this is called :)


A Waddle of Penguins

Aloha!

I was late finishing a group of penguin cards, but loving each one. Aren't penguins just precious to look at? Even the way they walk makes me SMILE! This one is holding hot cocoa with five marshmallows floating on top. And he's wearing a dottie sweater.

The penguin and scene is a digi image designed by Crissy Armstrong for Whimsy Stamps. She has a large collection of penguins and many other cute critters.

The card bases are stamped with VersaMark then heat embossed with a sparkly embossing powder. I colored the scenes with Copic markers and color pencils. I also stamped and colored the envelopes with a little girl in a parka and narwhal. It was very pleasurable to color these while watching old movies or listening to books. Let's see if I can be on time with summer cards :P


Image: "Penguin Coffee Break" digi by Crissy Armstrong at Whimsy Stamps; Avery Elle "Polar Pals" (little girl and narwhal); Polka Dot background stamp by MFT
Cardstock: GKD White 120#, Neenah white 80#, Black
Inks: Gina K. Designs, Hero Arts, Memento (metallic inks) VersaMark
Dies: Gina Marie
Copic markers, color pencils
WOW "Clear Sparkle" embossing powder
Glossy Accents
Snowflakes Toner Sheets by GKD
Irridescent foil by GKD & Minc machine; Nuvo Sparkle Pens; clear gems and sequins
Envelopes (very smooth) Stampin' Up


If I could send a handmade card to every 
person I know, my heart would sing long passed when
 the cows come home, or longer.


Mahalo for stopping by :*


Triple Stamping Teddy Bears

Aloha, friends!

A dear friend of ours went through a second open heart surgery recently. Talk about worry. I will never forget the first time I worked in an ICU and we received an open heart surgery from the O.R.

When I saw this teddy bear stamp, all I could think of was putting a sweet little red heart on it in case I needed an open heart surgery or other surgery card. If you lift up the top flap of the heart, it has a special, mini sentiment in there. Then you can lower the front of the heart back down. All I needed was a mini bandaid to stick on the heart, but we don't have one. Instead of triple stamping this, perhaps I dozen-stamped this bear in order to get the 3 colors and depth to the fur. I also used some markers and pointalism to get the shading. But he has the right amount of fluff now!

Our friend has arrived back from the east coast yesterday :D I think he's going to be fine. I hope he likes his teddy bear card because after all, he is a big teddy bear himself.


Stamp Set: "Baby Bear" (for adults, too, ☺) by Stampin' Up
Inks: Gina K. Designs; Tombow Markers
Card: Gina K. Designs 120# Ivory and Red
Stitched and Rectangle dies by MFT
Mini Heart paper punch, Glossy Accents, Scor Tape, Soft gold round metal gems, ribbon by GKD


Mahalo for coming by!!!


"Black Parrot" and "Green Wave" Tulips (Ugly version vs pretty version)

Aloha, all,

Part 1 of 2: The "Black Parrot" Tulips (or
as I view these: Ugly & Pretty)


Did you know there are tulips that are almost all black or deep, deep bluish purple? I've seen pictures but I don't recall seeing them growing. North of Seattle, Washington are tulip farms! Each spring, as far as your eyes can see, are rows and rows of solid colors - one row red, another yellow, another white. You can turn around in a circle and see colors, in perfect rows from anywhere you look. It is breathtaking!

I didn't want to just use blacks and navy to color flowers, so I added pinks and lavenders, too. First I Masked the bottom or first layer of flowers and using the new-to-me "Life Changing Blender Brushes" from Picket Fence Stamps. Yup, they are even easier to use than Clarity brushes or sponging tools. I sponged pink and blue distress inks into a rectangle, ever so slightly. Then I colored the flowers on the card base.

After printing another digi of the tulips onto cardstock, I colored and fussy cut the flowers and leaves. Finally, I popped them on fussy cut pieces of foam. It's sort of like the old decoupage 3D look. I regret adding the Spectrum Noir sparkle marker over the flowers but I'll just tuck that bit of experience into the deep cobwebs in my mind. I'll also add the "don't use super dark blues on flower edges even if they look black in real life" because they just take too much attention from the rest of the flower and scene.


Stamps: "Tulips" digital from Power Poppy (Tulips (and Peonies) are each on sale now for $2.49)
Cardstock: Neenah Solar White 110#
Copic Markers, Color Pencils, distress inks
Adhesive Foam, Scor Tape, Spectrum Noir Sparkle Marker, Sequins from Pretty Pink Posh


I'm sorry, these are ugly to me. But I'm posting them
just to show what not to do. Blech.
A ton of work ends up yucky.


Part 2 of 2: The "Green Wave" Tulips

So these turned out more eye pleasing. Seriously, what a long weekend of trying to capture realistic colors in a tulip LOLOLOL!

Same digi, different colors, Copic markers, no pencils, no sparkly marker. 


Don't say I'm not brave LOL. I'm even
posting ugly up there.

Mahalo for stopping by ♥