Monday, November 14, 2016

Coloring Book Flower

Aloha ♥

Are you into using coloring books? I was trying to hold off as long as possible. But I saw one on Amazon called "Color Calm." The name intrigued me. It's about 8" x 5" and takes color markers well without bleed through. But I won't tempt it with water. This is not a card but an 8 x 5 picture with an easel on the back.

I still cannot find the first project I colored in it. That baffles me. My Bible showed up :D :D :D Bruce had laid something on it. Color me happy. Plus I am watching some gentle hula and listening to Hawai'ian music. Heavenly. If you enjoy gentle guitar and beautiful Hawai'ian singing with hula, check out this link and let your mind dream you are in the islands ♥


Color Calm coloring book
Kaisercraft gel pens (a lot of these colors are metallic. I wish you could see it IRL)
I used the Black metallic pen to add the dotted outline
Sponged background with Memento Inks; grass blades with Memento markers
Cardstock: GKD Ivory 120#; AC blue and green
Corner Rounder
Tear Drop Rhinestones


Mahalo nui loa for all your love ♥ With aloha


Sunday, November 13, 2016

Sunset Thanks

Aloha again (twice in one day)!

I started this and the previous card yesterday. Yesterday was embossing day and today is distress ink coloring day. This is also an emboss resist and I considered adding it to the previous post but Blogger does funny things if you combine posts.

Same technique, stamp set, inks but without adding markers or glossy accents, same challenge Paper Smooches "Give Thanks!" 

Stamp Set: "Botanicals 1" by Paper Smooches
Die "Thanks" Paper Smooches
Cardstock: GKD 120# 80# white; AC Black
Inks: Distress Inks "Squeezed Lemonade, Fossilized Amber, Wild Honey, Fired Brick"
Ranger Detailed Black EP, VersaMark pad and marker (dots)


Mahalo for making the trip over to my blog!!
With aloha ♥


Dragonfly Night

Aloha all,

And look at that, another week gone by. I hope yours was a great one and here's to the next one!

This is a nighttime sky cause I love astronomy, meteor showers, planet watching, and any kind of cool sky sights! Paper Smooches Challenge is "Giving Thanks!" I am thankful for every moment and all of the creations around us ♥

Using the Emboss Resist technique is a great deal of fun for me :) It's fast, usually easy (sometimes not) and you never know exactly how the blended inks will look when you're done.

I used the VersaMark marker to add the black dots, embossed, splattered water drops, and then used Sakura metallic gel pens for different star colors. Every once in a while we can see a twinkle of green, blue, yellow, reds so I made sure to add a couple of those stars and even a shooting star. I covered the black embossed parts and sentiment with Glossy Accents. I did the bottom half of the sentiment with purple and the top of it with blue perfect pearls (before the Glossy Accents). You can't really see the two colors on sentiment like IRL.


Stamp Set: "Botanicals #1" by Paper Smooches
Die: "Thanks" by Paper Smooches
Cardstock: GKD 120# and 80# white; AC black
Inks: Distress Inks "Tumbled Glass, Blueprint Sketch, Milled Lavender, Dusty Concord and Black Soot"
Perfect Pearls Interference Blue and Violet (Interference pearls looks esp brighter on dark cardstock - this is black)
VersaMark, Ranger Detailed Black EP, Glossy Accents, Signo White Gel Pen, Sakura Metallic Gel Pens, Dries Clear Adhesive


And thank you for stopping by!
With aloha ♥


Friday, November 11, 2016

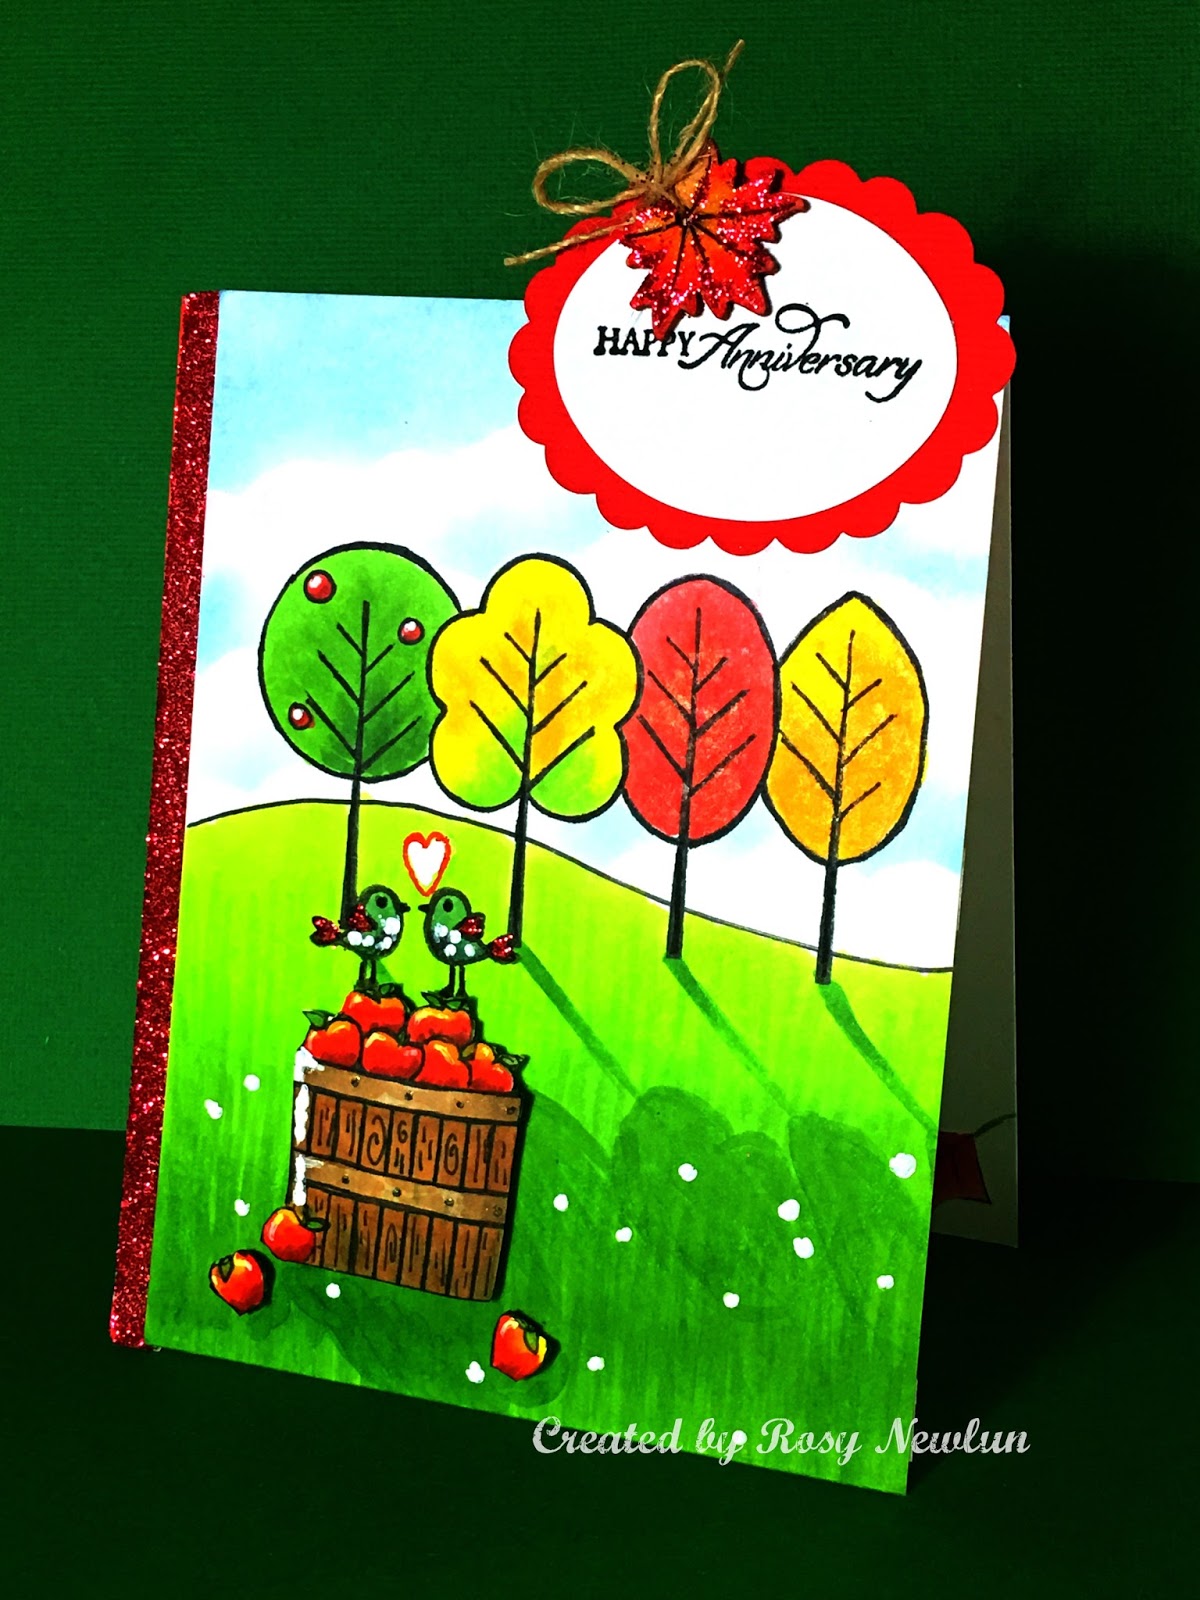
Sunkissed Autumn Anniversary

Aloha friends!!!

How was your week? I hope it was wonderful ♥ And now we go into another weekend and life is going faster and faster. I'm still trying to catch up on Anniversary cards!

I have lost the last two projects I worked on {sigh!}. Looked everywhere but at least I found my giant Bible. It went missing in here, too!

StampTV has a challenge this week to USE A TREE! Seemed easy enough but I'm still having to work on when to stop.

--Ye Olde Products Used--

Stamp Sets: "A Sunkissed Autumn," "Fanciful Tags" (sentiment) and "Whimsical Fall" (the apple basket and leaves) - all by Gina K. Designs
Cardstock: GKD White 120#, Neenah 80# White, and a little AC Red
Inks: Copic Markers (almost everything but sky), Memento Dew Drops(sky), VersaFine Black (sentiment)
"Vintag" Rose Bud Red Glitter
Wooden Leaf (from one of the StampTV kits) colored and then glittered
Stampin' Up oval and scalloped oval paper punches
Other: Dries Clear Adhesive, Scor Tape (line down side which I added glitter to), Ranger White Enamel Accents, SN clear glitter marker, Memento Black marker, BIC Red marker

PS That is not birdie doo dripping down the apple basket.
I meant it to be a highlight but the
Signo gel pen was to transparent, so I used the
Enamel accents. It dried faster than
I could wipe some off :(


Mahalo for stopping by to visit!!!
With lots of aloha ♥


Sunday, November 6, 2016

A Set of Cards for Gifting

Aloha!

How are you my friends? It's a beautiful, sunny but cooler day here in Hawai'i. We can feel "fall" in the air, too, as it gets cool at nights and mornings, a crispness but still warm afternoons in the 80s. This is my favorite time of year in Hawai'i! The humpback whales start showing up to calve their young, then start back for Alaska around March.

I made a little set of cards to give to friends. The cards and envelopes are ocean themed. I like to give a book of stamps with cards which is an idea I got from Jennifer McGuire ♥ It will make it easier for them to use if the stamps are right there with them. Using a MISTI makes it super fast to kick multiple cards out. After stamping, I flicked a little ink to make ocean spray. The backs of the envelopes are stamped with faded sand pipers.


Stamp Sets: "Wetlands (for the gift cards and envelopes)" and "Sheltering Tree (the envelope for personal card)" by Stampin' Up
Cardstock: GKD Prickly Pear, White - both 120 and 80#
Ink: Memento; VersaFine Sepia for the sentiment; GKD mini inks for the tree on envelope
Spetrum Noir clear glitter brush pen
MISTI


Gift Card Set "Wetlands"


The envelope with a personal card inside;
Pkg of "pet" forever stamps :)


Thank you for stopping by dear ones!
Have a great week ahead ♥


Friday, November 4, 2016

A Purr-fect Day!

Aloha!

Today is Day 4 of the The Daily Marker 30-Day Challenge. I'm still hanging in there :D

Isn't this a sweet image? I love Penny Black's little critter images and have not yet inked this set up yet. So, it's about time!

The image is colored with color pencils and blended with Gamsol. But you know me - it was just too plain so I kept on going. I edged layer with blue, then sponged blue and pink around the sky and made some violet. Then I got bored with the usual rectangles and drew two lines and cut the corner out of the top left. I added the glass dew drops and used foam under the sentiment, Glossy Accents on the butterfly and flower. I added a gold heart charm to her collar and some ground.

Entered into:


Stamp Set: "A Purr-fect Day" by Penny Black
Cardstock: GKD White 120# and 80#
Inks: Memento Tuxedo Black, Summer Sky, Angel Pink
Prismacolor Pencils & Gamsol
Dew Drops, Pigma Micron Marker & Ruler, Glossy Accents, SU Round Punch, Signo Gold Gel Pen


Thank you dear ones for stopping by!
With aloha ♥


Thursday, November 3, 2016

Jane's Doodles

Aloha everyone!

Day 3 of the Daily Marker 30-day Color Challenge. This is the little engine that could...

Another simple card - just used some watercolor pencils and glitter, trying to keep it eeeeeeezeeeeeee to keep chugging along through this month long challenge. I didn't use watercolor paper but if you only use a tad of a damp brush, you can smooth the watercolor pencil out and blend :D Then take each of the colors you used, make a little puddle (I used my craft mat) and then from way up high, tap your paint brush to leave speckles all over. I tore a piece of scrap paper to cover the vase and flowers as I did that. This is another anniversary card ♥ and I'll add the sentiment maybe later tonight.


Stamp Set: Jane's Doodles "Mom"
Inktense Watercolor Pencils and just a "smidge" of water
GKD 120# White Cardstock and some ... I forget which pattern paper this is (oops, sorry)
Stickles, Tombow Mono Multi Glue, SU Dazzles Glitter, Corner Rounder
JustRite "Nested Ovals Labels" Dies


With lots of aloha ♥


Wednesday, November 2, 2016

Fall Poppies

Aloha dear ones,

I'm still wrapping my head around November already. Just can't believe it. Ok, if I remember correctly, during the fall you can still see some poppies around the southern states. If not, here are a few!

These are very simple, just colored with Copics and a few color pencils. I have not used a ribbon in a long time and had to cover some space towards the bottom. There's some Spectrum Noir clear sparkle on the flower petals and little black drops scattered in the background. And it's done :)  I am so many anniversary cards behind that I'm sorry if I didn't send you one. I'll try for next year?  This is for a coupe close by so I think we can get it to them, late.

Remember, the Daily Marker 30-day Coloring Challenge. Color anything and enter it during November. Lots of prizes and fun video tutorials, all free.


Stamp Set: "Pleasant Poppies" by Stampin' Up
Cardstock: GKD White and AC Black
Gingham Ribbon, Black Liquid Pearls, SN glitter marker
Copic markers and Prismacolor Pencils

**Helpful Hints** You know how red alcohol inks love to bleed all over the place? At least for me they do. And if I use the blender pen, it just spreads more. So... here's what I do now. If red is spilling outside the lines, I take a white opaque color pencil and just color over it. I hope you can't tell which flowers bled all over lol. Well, it's a lot less visible anyhow.


Tuesday, November 1, 2016

Gel Pen Flowers

Aloha there,

This is a day of several firsts. It's the first time I am using a coloring book, gel pens to color the whole page, and creating a short video for an Amazon review of the pens. Whew, what a day!

And it's November!!!!

The Coloring Book was marked down on Simon Says Stamp a while back, so I caved and bought it. In the center is a page of flowers. The blank pages on the left side have an affirmation or positive thought for the day. The pages are 7 X 4-1/4 inches each so you can easily cut pages to fit smaller cards. This one I left whole, and on a single layer, not a card.

This will be entered into Day #1 of Kathy Racoosin's "30 Day Coloring" challenge. You can enter on Instagram, her blog, or join her new 30-day Coloring Challenge Group on Facebook to upload your photos. They have many, many giveaways at the end of the month. The whole idea behind her monthly coloring challenges is to make us take a short, daily (if possible) break - 10, 15 maybe 20 minutes, to give our minds and souls a chance to clear and wind down. You do NOT have to make a card or even complete the coloring project each day (even though it might feel weird not to lol). I hope you will play along! Here is a link:


Coloring Book: "Color Calm" by Valentina Harper,, a floral/dotty page
"Top Quality Gel Pens, pack of 60" on Amazon (I got them for around $14 and now they are down to just over $10!) plain, and metallic colors
Perfect Pearls Black Onyx (little black dots on the silver areas)
Dazzle Glitter by SU, sprinkled over wet dots of 3D Crystal Lacquer (very sparkly)
Matted onto white, then black cardstock


Mahalo for visiting!!!! 
Wishing you a beautiful week, filled with creativity ♥

Monday, October 17, 2016

Pineapple Anniversary

Aloha!

Hero Arts is having a GEOMETRIC Challenge for the month of October. Geometric. All I could think of is to use an image over and over into a symmetrical design. When I saw the pineapple stamp in a set, it felt like me :D

I didn't create stripes or triangles or anything like that. But I did use a ruler to mark off squares because you don't want to see the first attempt LOL. It's so funny! The back side still looks usable and that's why paper has two sides. Without further ado...


Stamp Sets: "Enjoy the Journey" (pineapple) and "Everyday Sayings" (sentiment)
Cardstock: GKD White and Asparagus; Pearl Vellum (sentiment)
Inks: Hero Arr Minis "Buttercup" and "Field Greens" and VersaFine Black (sentiment)
Memento Markers (on the pineapple embellie)
VersaMark and Clear Embossing Powder over the Pineapple embellie
Gold Cord GKD
Light Yellow Pearls by Want2Scrap
Wink of Stella (on the pineapple crowns)


How to make your own stamped embellishments:  (see the highlighted pineapple on the card?)

Stamp and color/ink any way you wish. Fussy cut or die cut. Ink the edges (I used black here). Get some tweezers. Press your color sided image onto VersaMark pad really well. Place it on a piece of scrap paper, creased in middle. You will pour clear embossing powder all over this and using the tweezers to barely hold a spot of the image, heat with your heat tool - possibly repeating two or three layers of powder and heat until you get a nice, shiny, plastic or glass finish. You can also use UTEE (ultra thick embossing powder in clear) but I use that for larger images. You will be amazed how this turns out. 

Presents? Punch a small hole through the tops of your images prior to heat embossing. When you are done with the process, use a needle or pokey tool to ensure the hole is patent after all that embossing. let it cool off. You can even finish the backside if you wish. Thread metallic cording, thin leather cording, tiny chains - even French hook earrings to create specific, handmade gifts for friends and family. Or you can glue magnets to the back for some frig love reminders. Write a message on your image before embossing, using your loved one's name, a tiny poem - anything. Any image or drawing you use can become a handmade, beautiful gift. Just do it!!! (sorry Nike)

You can even make little rear view mirror charms, phone charms, bookmark charms. Let your imagination go wild. Somehow I stumbled across this idea way back so I don't know if it was serendipity or if I should credit a tutorial I saw years back and tweaked it just for my own use. 


Mahalo for stopping by dear ones!
With aloha ♥


Pineapple Anniversary

Aloha!

Hero Arts is having a GEOMETRIC Challenge for the month of October. Geometric. All I could think of is to use an image over and over into a symmetrical design. When I saw the pineapple stamp in a set, it felt like me :D

I didn't create stripes or triangles or anything like that. But I did use a ruler to mark off squares because you don't want to see the first attempt LOL. It's so funny! The back side still looks usable and that's why paper has two sides. Without further ado...


Stamp Sets: "Enjoy the Journey" (pineapple) and "Everyday Sayings" (sentiment)
Cardstock: GKD White and Asparagus; Pearl Vellum (sentiment)
Inks: Hero Arr Minis "Buttercup" and "Field Greens" and VersaFine Black (sentiment)
Memento Markers (on the pineapple embellie)
VersaMark and Clear Embossing Powder over the Pineapple embellie
Gold Cord GKD
Light Yellow Pearls by Want2Scrap
Wink of Stella (on the pineapple crowns)


Mahalo for stopping by dear ones!
With aloha ♥


Saturday, October 15, 2016

PS. Celebrate!

Aloha dear friends!!!

I'm sorry for not commenting on your cards much this week or even being on FaceBook or any place. S-t-r-e-s-s  O-v-e-r-l-o-a-d. I have had to stop adulting for a few days. Coloring and painting are in order for a while.

This card is going into the Paper Smooches Color Inspiration Challenge aka Fall Color Study for October. These are not my go-to colors so it's definitely a challenge. Here is a picture of the colors:


Using watercolors, I painted a blend of these colors, then die cut out shapes. For the flower and sentiment (for anniversary card) upper right, I used Copic Markers. What you cannot see is the VersaMark Dazzle flower images stamped all over the white card base (you have to tilt the card to see it). You also cannot see that I covered the hearts and the centers of the flowers with Glossy Accents. I also let the watercolors dry, then sprayed a layer of Perfect Pearls "Pearl" all over it and let it dry again. The inside has another flower image colored and fussy cut with a mini plum-colored heart ♥ I outlined all the fussy cutting and die cuts with either black, pink or purple markers, you know, the teensy details :D


Stamp Sets: "Best Buds" (the flowers and sentiment), and "Botanicals #1" (watermarking the front)
Cardstock: GKD 120# white, Neenah 80# white, AC dark mauve
Strathmore Watercolor 300 Series
Gansai Tambi Watercolors
Copic Markers; Memento black, purple and pink markers for edging die cuts
VersaMark Dazzle (for watermarking the card background)
SU Pennant Dies
SU Triple Heart Punch (the hearts are punched from the watercolor portion); corner rounder
Glossy Accents; Perfect Pearls spray (in Pearl); Foam Squares in white and in clear

Mahalo so much for stopping by!
Please be patient with me to start adulting again ♥


Wednesday, October 12, 2016

Pop Up Hedgehogs :)

Aloha dear friends!

Is October almost half over? Please slow the clock and calendar down?

This is a card that took me a couple of days because 1) it's a pop up 2) I have no pop up die thingeys 3) It's like a two-in-one card because you can't leave the front empty lol!!!!

I love the hedgehog craze. I almost added action wobblers but learning when to STOP is still an ongoing learning process here.


Made for Day 3 - Pop Ups for Wild Card Class!

Stamp Sets: "Happy Hedgehogs" by Birdie Brown for My Favorite Things; and the sun on the inside is from "Happy Day" by Simon Says Stamp!
Cardstock: GKD 120# white base, Pattern Paper is Authentique, cut out images are on Neenah 80# white
Inks: Memento inks and markers, VersaFine Black, Distress inks, Copic Markers
Stencil (clouds, hills, grass) "Make a Scene" by Simon Says Stamp!
SB Curved Border Die (on the pattern paper edge)
SU label and word punches
Rhinestones, flower punches, circle punches, butterfly punches (I'm so tired I don't remember which ones I used but I'm sure anything you have will work); Spectrum Noir Clear Glitter Marker


Front


Inside


Close Up of the Hedgehogs


Sunday, October 9, 2016

Clang, Clang, Clang Went the Trolley!

Aloha!

Today's card is for Day #2 of Online Card Class "Movement" Theme.  The simplest I saw from the examples is the slider card and I'm all for easier right now.

This is a Thank You/Proud of You card for all the hard work our daughter recently did for us despite an old ankle bone injury that got all swelled up while she was here. Her hubby stayed home on this trip, but she worked her hiney off. They do volunteer work every week at the end of a trolley car in San Francisco. This trolley is covered in Glossy Accents and slides really easily up and down the trolley line! I hope they like it - it's a SURPRISE ♥

I found a free trolley image online and shrunk it down to about an inch for this card. I used a long strip of foam on the back of the penny so it slides back and forth easily, not spins!

I used Prismacolor Pencils for coloring everything, sketching in the background, and trying to give a fall feel for the scene. I used a bit of Gamsol on the ocean and trees in the background. The stencil in the front is a sort of cobblestone design. I used a lot of Fun Foam, a penny, and Scor Tape to put this together. It's a rectangular card, about 6-1/4 inch by 4-3/4 inches.


Stamp Set: "San Francisco" by Hero Arts, Clearly Kelly
   (I'm not sure of the company who made the sentiment stamps)
Cardstock: GKD 120# white, 80# white, and (love) her Charcoal color cardstock
Inks: Memento Tuxedo Black and London Fog; Prismacolor Pencils; Gamsol; Spectrum Noir Clear Glitter Marker
"Mini Tile Texture" by The Crafter's Workshop
Fun Foam, Scor Tape, Dries Clear adhesive
GKD Fine Detail White Embossing Powder
Glossy Accents (on the red sway bars on the bridge, apples on tree, and on the trolley)


Mahalo for stopping by!
With aloha ♥


Friday, October 7, 2016

Up in the Sky, Butterfly!

Aloha!

How are you? It's been a very rough week here, but hey, still kicking!

I joined the current Online Card Class with Jennifer and Kristina & lots of fun others and it's called "Wild Card!!!" I love the way Laura Bassen sings it like Spongebob in her tutorials lol! She always cracks me up!

Come join in the fun if you can! There are five days of lots and lots of cool how-to tutorials for wild cards! We have til October 13 to create and upload. Today is Day 5 - as you can see, I am starting on the last day of the class (sigh, hard week).  Anyway, click HERE!!! to see the intro video. Likely you already have all the supplies on-hand so no worries about needing to buy anything new.

Day 1 -- Shapes, Openings and 3D Cards

I went with Shapes. My brain is mush so this seemed like the easiest way to begin creating. Technique: Partial Die Cutting. I traced the butterfly shape with a pencil, then fussy cut out one folded shape using GKD 120# white as the basic shape and inside of the card. I used Neenah Solar White 80# for the outer butterfly that die cut and colored with distress inks. After inking the outer butterfly, I glued it to the stronger white inner shape and added a few gems.


Die: Anna Griffin Butterfly
Cardstock: GKD 120# white and Neenah Solar White 80#
Distress Inks: Squeezed Lemonade, Worn Lipstick and Picked Raspberries
Adhesive: Art Institute Dries Clear
Gems: Want2Scrap mini Clear rhinestones, Teardrop Rhinestones; Clear Red dots by Cloud 9


Thank you for coming by to peek
and to leave some love!!!
Aloha dear ones!