Monday, October 17, 2016

Pineapple Anniversary

Aloha!

Hero Arts is having a GEOMETRIC Challenge for the month of October. Geometric. All I could think of is to use an image over and over into a symmetrical design. When I saw the pineapple stamp in a set, it felt like me :D

I didn't create stripes or triangles or anything like that. But I did use a ruler to mark off squares because you don't want to see the first attempt LOL. It's so funny! The back side still looks usable and that's why paper has two sides. Without further ado...


Stamp Sets: "Enjoy the Journey" (pineapple) and "Everyday Sayings" (sentiment)
Cardstock: GKD White and Asparagus; Pearl Vellum (sentiment)
Inks: Hero Arr Minis "Buttercup" and "Field Greens" and VersaFine Black (sentiment)
Memento Markers (on the pineapple embellie)
VersaMark and Clear Embossing Powder over the Pineapple embellie
Gold Cord GKD
Light Yellow Pearls by Want2Scrap
Wink of Stella (on the pineapple crowns)


How to make your own stamped embellishments:  (see the highlighted pineapple on the card?)

Stamp and color/ink any way you wish. Fussy cut or die cut. Ink the edges (I used black here). Get some tweezers. Press your color sided image onto VersaMark pad really well. Place it on a piece of scrap paper, creased in middle. You will pour clear embossing powder all over this and using the tweezers to barely hold a spot of the image, heat with your heat tool - possibly repeating two or three layers of powder and heat until you get a nice, shiny, plastic or glass finish. You can also use UTEE (ultra thick embossing powder in clear) but I use that for larger images. You will be amazed how this turns out. 

Presents? Punch a small hole through the tops of your images prior to heat embossing. When you are done with the process, use a needle or pokey tool to ensure the hole is patent after all that embossing. let it cool off. You can even finish the backside if you wish. Thread metallic cording, thin leather cording, tiny chains - even French hook earrings to create specific, handmade gifts for friends and family. Or you can glue magnets to the back for some frig love reminders. Write a message on your image before embossing, using your loved one's name, a tiny poem - anything. Any image or drawing you use can become a handmade, beautiful gift. Just do it!!! (sorry Nike)

You can even make little rear view mirror charms, phone charms, bookmark charms. Let your imagination go wild. Somehow I stumbled across this idea way back so I don't know if it was serendipity or if I should credit a tutorial I saw years back and tweaked it just for my own use. 


Mahalo for stopping by dear ones!
With aloha ♥


Pineapple Anniversary

Aloha!

Hero Arts is having a GEOMETRIC Challenge for the month of October. Geometric. All I could think of is to use an image over and over into a symmetrical design. When I saw the pineapple stamp in a set, it felt like me :D

I didn't create stripes or triangles or anything like that. But I did use a ruler to mark off squares because you don't want to see the first attempt LOL. It's so funny! The back side still looks usable and that's why paper has two sides. Without further ado...


Stamp Sets: "Enjoy the Journey" (pineapple) and "Everyday Sayings" (sentiment)
Cardstock: GKD White and Asparagus; Pearl Vellum (sentiment)
Inks: Hero Arr Minis "Buttercup" and "Field Greens" and VersaFine Black (sentiment)
Memento Markers (on the pineapple embellie)
VersaMark and Clear Embossing Powder over the Pineapple embellie
Gold Cord GKD
Light Yellow Pearls by Want2Scrap
Wink of Stella (on the pineapple crowns)


Mahalo for stopping by dear ones!
With aloha ♥


Saturday, October 15, 2016

PS. Celebrate!

Aloha dear friends!!!

I'm sorry for not commenting on your cards much this week or even being on FaceBook or any place. S-t-r-e-s-s  O-v-e-r-l-o-a-d. I have had to stop adulting for a few days. Coloring and painting are in order for a while.

This card is going into the Paper Smooches Color Inspiration Challenge aka Fall Color Study for October. These are not my go-to colors so it's definitely a challenge. Here is a picture of the colors:


Using watercolors, I painted a blend of these colors, then die cut out shapes. For the flower and sentiment (for anniversary card) upper right, I used Copic Markers. What you cannot see is the VersaMark Dazzle flower images stamped all over the white card base (you have to tilt the card to see it). You also cannot see that I covered the hearts and the centers of the flowers with Glossy Accents. I also let the watercolors dry, then sprayed a layer of Perfect Pearls "Pearl" all over it and let it dry again. The inside has another flower image colored and fussy cut with a mini plum-colored heart ♥ I outlined all the fussy cutting and die cuts with either black, pink or purple markers, you know, the teensy details :D


Stamp Sets: "Best Buds" (the flowers and sentiment), and "Botanicals #1" (watermarking the front)
Cardstock: GKD 120# white, Neenah 80# white, AC dark mauve
Strathmore Watercolor 300 Series
Gansai Tambi Watercolors
Copic Markers; Memento black, purple and pink markers for edging die cuts
VersaMark Dazzle (for watermarking the card background)
SU Pennant Dies
SU Triple Heart Punch (the hearts are punched from the watercolor portion); corner rounder
Glossy Accents; Perfect Pearls spray (in Pearl); Foam Squares in white and in clear

Mahalo so much for stopping by!
Please be patient with me to start adulting again ♥


Wednesday, October 12, 2016

Pop Up Hedgehogs :)

Aloha dear friends!

Is October almost half over? Please slow the clock and calendar down?

This is a card that took me a couple of days because 1) it's a pop up 2) I have no pop up die thingeys 3) It's like a two-in-one card because you can't leave the front empty lol!!!!

I love the hedgehog craze. I almost added action wobblers but learning when to STOP is still an ongoing learning process here.


Made for Day 3 - Pop Ups for Wild Card Class!

Stamp Sets: "Happy Hedgehogs" by Birdie Brown for My Favorite Things; and the sun on the inside is from "Happy Day" by Simon Says Stamp!
Cardstock: GKD 120# white base, Pattern Paper is Authentique, cut out images are on Neenah 80# white
Inks: Memento inks and markers, VersaFine Black, Distress inks, Copic Markers
Stencil (clouds, hills, grass) "Make a Scene" by Simon Says Stamp!
SB Curved Border Die (on the pattern paper edge)
SU label and word punches
Rhinestones, flower punches, circle punches, butterfly punches (I'm so tired I don't remember which ones I used but I'm sure anything you have will work); Spectrum Noir Clear Glitter Marker


Front


Inside


Close Up of the Hedgehogs


Sunday, October 9, 2016

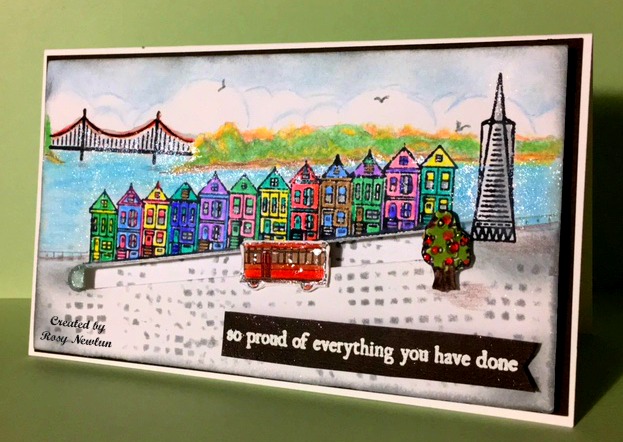
Clang, Clang, Clang Went the Trolley!

Aloha!

Today's card is for Day #2 of Online Card Class "Movement" Theme.  The simplest I saw from the examples is the slider card and I'm all for easier right now.

This is a Thank You/Proud of You card for all the hard work our daughter recently did for us despite an old ankle bone injury that got all swelled up while she was here. Her hubby stayed home on this trip, but she worked her hiney off. They do volunteer work every week at the end of a trolley car in San Francisco. This trolley is covered in Glossy Accents and slides really easily up and down the trolley line! I hope they like it - it's a SURPRISE ♥

I found a free trolley image online and shrunk it down to about an inch for this card. I used a long strip of foam on the back of the penny so it slides back and forth easily, not spins!

I used Prismacolor Pencils for coloring everything, sketching in the background, and trying to give a fall feel for the scene. I used a bit of Gamsol on the ocean and trees in the background. The stencil in the front is a sort of cobblestone design. I used a lot of Fun Foam, a penny, and Scor Tape to put this together. It's a rectangular card, about 6-1/4 inch by 4-3/4 inches.


Stamp Set: "San Francisco" by Hero Arts, Clearly Kelly
   (I'm not sure of the company who made the sentiment stamps)
Cardstock: GKD 120# white, 80# white, and (love) her Charcoal color cardstock
Inks: Memento Tuxedo Black and London Fog; Prismacolor Pencils; Gamsol; Spectrum Noir Clear Glitter Marker
"Mini Tile Texture" by The Crafter's Workshop
Fun Foam, Scor Tape, Dries Clear adhesive
GKD Fine Detail White Embossing Powder
Glossy Accents (on the red sway bars on the bridge, apples on tree, and on the trolley)


Mahalo for stopping by!
With aloha ♥


Friday, October 7, 2016

Up in the Sky, Butterfly!

Aloha!

How are you? It's been a very rough week here, but hey, still kicking!

I joined the current Online Card Class with Jennifer and Kristina & lots of fun others and it's called "Wild Card!!!" I love the way Laura Bassen sings it like Spongebob in her tutorials lol! She always cracks me up!

Come join in the fun if you can! There are five days of lots and lots of cool how-to tutorials for wild cards! We have til October 13 to create and upload. Today is Day 5 - as you can see, I am starting on the last day of the class (sigh, hard week).  Anyway, click HERE!!! to see the intro video. Likely you already have all the supplies on-hand so no worries about needing to buy anything new.

Day 1 -- Shapes, Openings and 3D Cards

I went with Shapes. My brain is mush so this seemed like the easiest way to begin creating. Technique: Partial Die Cutting. I traced the butterfly shape with a pencil, then fussy cut out one folded shape using GKD 120# white as the basic shape and inside of the card. I used Neenah Solar White 80# for the outer butterfly that die cut and colored with distress inks. After inking the outer butterfly, I glued it to the stronger white inner shape and added a few gems.


Die: Anna Griffin Butterfly
Cardstock: GKD 120# white and Neenah Solar White 80#
Distress Inks: Squeezed Lemonade, Worn Lipstick and Picked Raspberries
Adhesive: Art Institute Dries Clear
Gems: Want2Scrap mini Clear rhinestones, Teardrop Rhinestones; Clear Red dots by Cloud 9


Thank you for coming by to peek
and to leave some love!!!
Aloha dear ones!